Beauty, China Glaze, City Color Cosmetics, DIY, Fashion, Nail Art, Nail Art Tutorial, Nail Polish Swatch, Nailed Kit, Nails, Nails How To, Style

Nail Finds at the Winter 2013 New Girl Expo

Last Saturday I attended the New Girl Expo in Los Angeles. The event, a one-stop shop fashion hub, was created to connect women of all styles to the trendiest beauty resources and stylish vendors. As a first-time guest, I was excited to see what kind of nail goodies I would find. I scored big time.

New Girl Expo provided me a very generous goodie bag that was stuffed with a few samples from vendors and a little extra something.

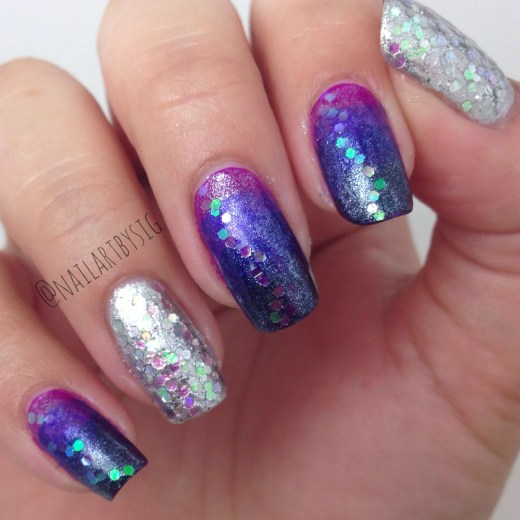
In it, was this beautiful glitter polish called, “Love Marilyn” by China Glaze ($5). This is what three coats of the polish looks like. Love Marilyn is perfect for the holidays!

love-marilyn-china-glaze

At the event I was introduced to a very affordable makeup brand called City Color Cosmetics. Here is a swatch of their brown polish called Chocolate ($3).

I was able to reach a desired opacity  and a nice shine after just two coats. The polish has a sort of a slow dry time, but it’s nothing a bit of fast-dry top coat can’t fix. I’m pretty happy with the results of this low-cost polish.

city-color-nail-polish-swatch

Another gem I stumbled upon was Nailed Kit, an easy-to-use nail decal system.

It was a true pleasure to meet the founder behind the product, Rachel Kim. Lucky for me, my New Girl Expo goodie bag had a sample of the water slide nail art decals. I clearly got a little excited and tested the sample before taking a photo of the whole thing intact.

nailed-kit

This was my first time ever using a nail decal of any sort. How do these work? Think of it as a temporary tattoo for your nail. Dip the decal is warm water, peal it off and apply.

I had a some slight application issues, like accidentally not cutting close enough to the image to get precise application (even though the directions instruct you to do so). That will definitely subside with some getting used to.

The best part of Nailed Kit is the adorable design you’re left to show off. How cute is this party hat?

birthday-nailed-kit

What do you think of these nail finds? Let me know in the comments below. 

Standard
Beauty, DIY, Fashion, Marc Jacobs, Nail Art, Nail Art Tutorial, Nail Polish Swatch, Nails, Nails How To, Style

Marc Jacobs 114 Snap! Nail Polish Swatch

Marc Jacobs 114 Snap! ($18) is the collection’s mandarin orange.

The beautiful orange hue provided a much needed pop of color during this cold season. While wearing Snap! I noticed my skin glowed! I’m looking forward to sport this polish in the summer.

marc-jacobs-nail-polish-snap-swatc

The creamy formula allowed for easy application with an opaque finish after the initial coat.

marc-jacobs-orange-snap-nail-polish

Snap! has a pretty fast dry time and leaves a high-gloss finish. The orange hue is very easy on the eyes even after a second coat.

snap-marc-jacobs-nail-polish-swatch

I was so impressed by the extra smooth finish I got after two coats, I didn’t even apply a top coat. I mean just look at these bright beauties!

marc-jacobs-snap-nail-polish-swatch

This is the seventh installment of a ten-part series of Marc Jacobs nail lacquer swatches. Keep scrolling down for the rest and stay tuned for more.

What do you think of Snap?Let me know in the comments below!

Standard
Beauty, DIY, Fashion, Marc Jacobs, Nail Art, Nail Art Tutorial, Nail Polish Swatch, Nails, Nails How To, Style

Marc Jacobs Evelyn Nail Polish Swatch

Marc Jacobs 144 Evelyn ($18) is the collection’s opaque smoky gray and it is a beautiful combination of black and white.

Every nail polish collection needs a perfect gray hue for a good tone. Evelyn is just that polish for me.

marc-jacobs-evelyn-swatch

Instagram, @nailartbysig

After the initial coat there were barely any streaks. The creamy formula makes for easy application.

marc-jacobs-evelyn-swatch

Instagram, @nailartbysig

The nail polish has a pretty quick dry time. By the second coat, I reached a desired opacity.

evelyn-marc-jacobs-swatch

Instgram, @nailartbysig

To smooth off the entire look, I added a very thin layer of top coat. The glossy finish is undeniable.

marc-jacobs-nail-polish-evelyn

Instagram, @nailartbysig

This is the sixth installment of a ten-part series of Marc Jacobs nail lacquer swatches. Keep scrolling down for the rest and stay tuned for more.

What do you think of Evelyn?Let me know in the comments below!

Standard
Beauty, Butter London, DIY, Essie, Fashion, Nail Art, Nail Art Tutorial, Nail Polish Swatch, Nails, Nails How To, Style, Vine

Spotted Christmas Nail Art

While decorating my home for the holidays, I came across this nifty ornament.

christmas-nail-art

I was intrigued by the unconventional pattern on it and I created a manicure inspired by it.

easy-to-do-christmas-nails

Instagram, @nailartbysig

Check out this time lapse Vine video I did while executing a design I called, “How Dalmatians Celebrate Christmas.”

What do you think of this design? Let me know in the comments below!

Standard
Beauty, DIY, Fashion, Marc Jacobs, Nail Art, Nail Art Tutorial, Nail Polish Swatch, Nails, Nails How To, Style

Blue Velvet by Marc Jacobs Nail Polish Swatch

Marc Jacobs 132 Blue Velvet ($18) is the collection’s iridescent deep ocean blue.

While wearing this color, I received compliments on the shine of this alluring and rich blue polish. Blue Velvet is particularly stunning in direct sunlight.

marc-jacobs-blue-velvet-nail-polish

Instagram, @nailartbysig

Blue Velvet is very opaque and definitely delivers the high-shine formula it promises. This is what one coat of the polish looks like.

blue-velvet-marc-jacobs-nail-polish

Instagram, @nailartbysig

When I did some clean up around my nails after an application of a thin second coat, I noticed some staining on my skin and cuticles. I’m worried it might be an issue once I completely remove the manicure. Heed my warning, base coat is not optional!

blue-velvet-marc-jacobs-swatch

Instagram, @nailartbysig

To smooth off the entire look, I applied a very thin layer of top coat. Are you in love with this color yet?

blue-velvet-marc-jacobs

Instagram, @nailartbysig

This is the fifth installment of a ten-part series of Marc Jacobs nail lacquer swatches. Keep scrolling down for the rest and stay tuned for more.

What do you think of Blue Velvet? Let me know in the comments below!

Standard
Beauty, DIY, Fashion, Marc Jacobs, Nail Art Tutorial, Nail Polish Swatch, Nails, Nails How To, Style

Oui! by Marc Jacobs Nail Polish Swatch

Marc Jocobs 118 Oui! ($18) is the collection’s magenta violet and it is unlike anything I’ve ever seen.

The nail polish has a smooth finish that resembles a metallic version of a radiant orchid- Pantone’s selected color of the year for 2014.

marc-jacobs-oui-nail-polish-swatch

Instagram, @nailartbysig

I had very little application issues and there were barely any brush streaks visible after the initial base coat.

oui-by-marc-jacobs-nail-polish

Instagram, @nailartbysig

Here’s what a second coat of Oui! looks like. Are you as in love with the polish as I am? She’s a beauty!

best-marc-jacobs-nail-polish

Instagram, @nailartbysig

After the second coat, there were a few spots that were still not at my desired opacity level so I applied a thin third coat on the spots that needed it.

Image

Instagram, @nailartbysig

The polish absolutely delivers the high-shine finish it promises and also has a pretty fast dry time. I added a very thin top coat to smooth off the entire look.

nail-polish-marc-jacobs-oui

Instagram, @nailartbysig

What do you think of Oui! by Marc Jacobs? Let me know in the comments below!

Standard
Beauty, Butter London, DIY, Essie, Fashion, Nail Art, Nail Art Tutorial, Nail Polish Swatch, Nails, Nails How To, OPI, Orly, Sally Hansen, Style

4 Winter Worthy Nail Polish Colors

Get in the spirit of the holidays and coat on some polish you can show off all season long.

Here are four winter worthy nail polish colors:

1. Gray nails for a midnight glow for your next holiday party.

I’m using Mirror Mirror by Orly with a coat of Snow Globe by Sally Hansen on the accent nail.

Image

Instagram, @nailartbysig

2. A deep purple hue with a sparkly gold accent for a bit of elegance and mystery on New Years Eve.

Here’s a swatch of  Under Your Spell by Wet n Wild with Wonderous Start by OPI on the party finger.

winter-nail-polish

Instagram, @nailartbysig

3. A shimmery version of the classic crimson when you’re feeling bold.

This is a swatch of Chancer by Butter London.

color-nail-polish-winter

Instagram, @nailartbysig

4. Winter navy blue with a bit of shimmering snow for a cold night out.

I’m wearing Midnight Cami by Essie with a coat of All Sparkly and Gold by OPI on the accent nail.

winter-nail-polish-color

Instagram, @nailartbysig

What do you think of these manicures? Let me know in the comments below!

Standard
Beauty, DIY, Fashion, Marc Jacobs, Nail Art, Nail Art Tutorial, Nail Polish Swatch, Nails, Nails How To

Ultraviolet by Marc Jacobs Nail Polish Swatch

Marc Jacobs 122 Ultraviolet ($18)  nail lacquer is the collection’s violet purple. The color is a super posh purple that is bright when it needs to be and is subtle in indoor lighting.  I truly feel royal in this manicure.

This is the third Marc Jacobs polish I try. After familiarizing myself with the creamy formula, I can’t emphasize enough that steady application, as well as waiting for each coat to completely dry are essential. Especially if you want to get the sleek and high shine finish the bottle promises. The great news is, the polish has a pretty quick dry time.

marc-jacobs-ultraviolet-nail-polish

I applied a very thin layer for the initial coat. At first swipe the polish gives off more of the red undertone and looks like a shade of magenta.

ultraviolet-marc-jacobs-purple

After a second coat, the blue hue is prevalent which reflects the color you see on the bottle.

ultraviolet-marc-jacobs

I’ve tried two other Marc Jacobs nail polishes and this was the first color that needed three coats to get the desired opacity. Keep scrolling down to see the other two Marc Jacobs nail polish swatches.

Here is what a third coat of Ultraviolet looks like.

ultraviolet-marc-jacobs

The polish has an ultra shine formula that wouldn’t require a top coat. To smooth off the entire design though, I added a thin layer of it.

marc-jacobs-nail-polish

This is the third installment of a ten-part series of Marc Jacobs nail lacquer swatches. Stay tuned for more.

What do you think of Ultraviolet? Let me know in the comments below!

Standard
Beauty, DIY, Fashion, Nail Art, Nail Art Tutorial, Nails, Nails How To, Style

Negative Space Chevron Nails Tutorial

You’re four steps away from showy and posh nail art.

negative-space-nails-tutorial

Instagram, @nailartbysig.

Execute this design in a breeze by mapping out the placement of the striping before application.

negative-space-chevron-how-to

Instagram, @nailartbysig.

What do you think of this look? Let me know in the comments below!

Standard
Beauty, DIY, Fashion, Katy Perry, Nail Art, Nail Art Tutorial, Nails, Nails How To, Style

Prismatic Nail Art

Lately, I’ve been relating to Katy Perry’s latest album, Prism. Her power anthems radiate positivity and I am letting the light in.

I celebrated my 24th birthday in November. I definitely wanted to shine. So I figured the occassion called for a prismatic mani.

katy-perry-nails

Instagram, @nailartbysig

I was particularly proud of the execution on both hands. They looked equally solid.

katy-perry-nails

Instagram, @nailartbysig

This manicure definitely got some attention. That day, I out-shined my own candles.

Here is a video of the entire manicure.

What do you think of this look? Let me know in the comments below! 

Standard