Beauty, DIY, Fashion, Nail Art, Nail Art Tutorial, Nail Polish Swatch, Nails, Nails How To, Style

Inside Shine and Sheen’s Urban Safari Kit

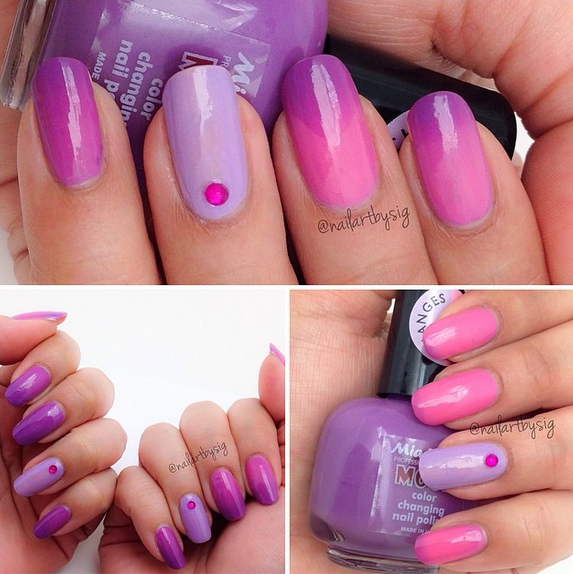
Trending brand alert! Shine and Sheen’s nail art kits are here and are packed with nail essentials every polish lover should have.

Offered in four different styles, the nail art kits ($30) come with three polishes and a top coat, two striper polishes, nail art tools like a file, cuticle stick or dotting pen, a nail art wheel and an array of nail decals. Not to mention, each package comes with an extensive how-to guide loaded with major nailspiration!

Here’s a look inside Shine and Sheen’s Urban Safari kit and bonus summer-ready looks you can execute with the products.

Kick off your summer on a wild side with these tribal nail stickers.

nail-art-shine-and-sheen

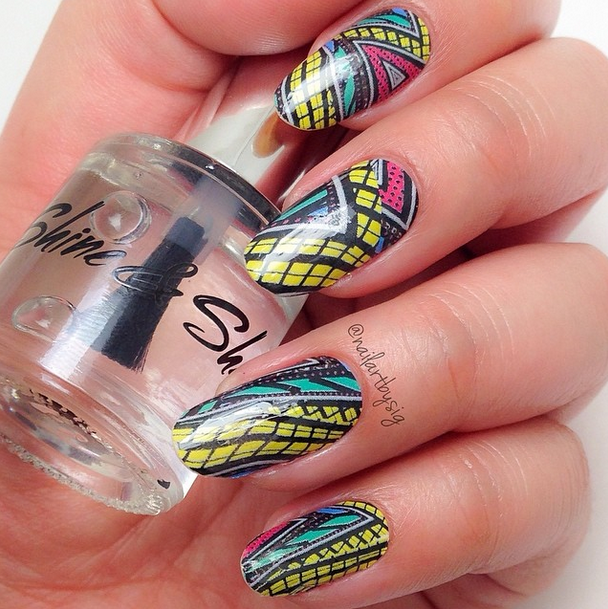
Check out this video and find out how to easily apply the decals.

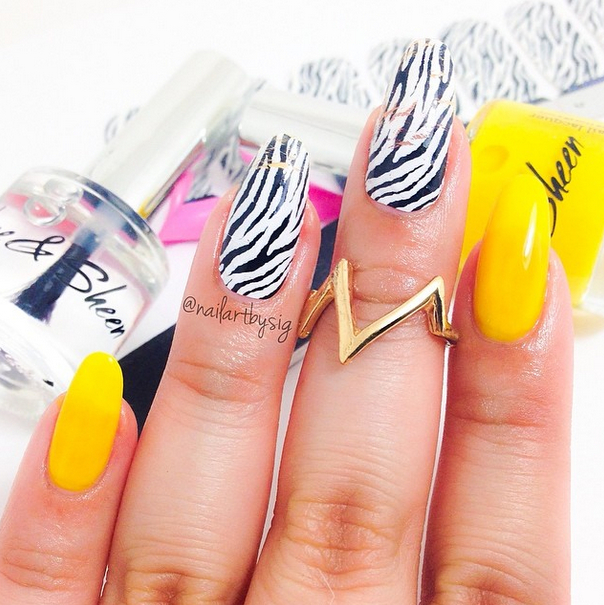
Add a pop of color to an animal print mani for a bold statement.

zebra-nails

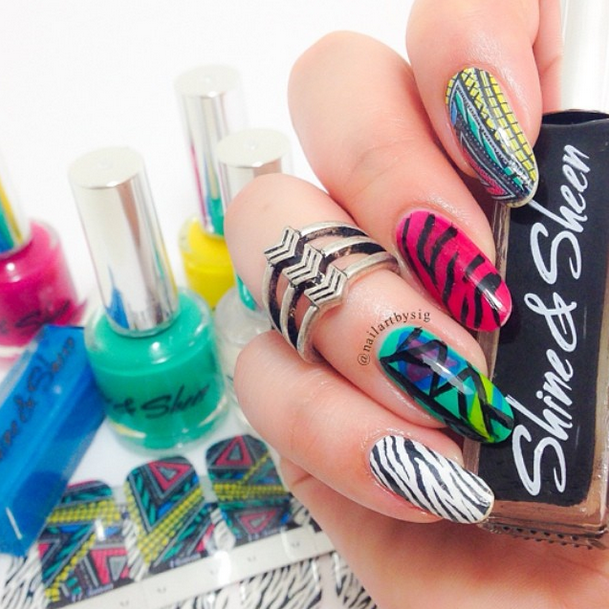
If you’re in the mood to play, you can mix and match the goodies found inside the kit for a abstract and chic look.

zebra-mani

What do you think of the Safari Kit? Let me know in the comments below! 

Standard
Beauty, DIY, Fashion, Nail Art, Nail Art Tutorial, Nail Polish Swatch, Nails, Nails How To, Style

Tips to Apply White Polish

A good white polish is a rare commodity. Aside finding one that doesn’t streak, qualities of a great white polish also include a highly pigmented formula so that multiple coats aren’t required.

I’m happy to report, Pure Ice’s Super Star! ($1.97) is not only extremely affordable, its creamy formula only requires two coats for a desired opacity.

A few helpful tips for applying a white polish:

1. Start off in the area right under the cuticle. White polish can be very unforgiving if there’s a messy application.

2. Wait for each coat to completely dry to avoid streaking.

3. Smooth off the entire look with a top coat that will help blend the polish. I use Sec ‘n Dry by Orly ($7.50).

super-star-pure-ice-swatch

What do you think of this polish? Let me know in the comments below! 

Standard
Baseball, DIY, Essie, Nail Art, Nail Art Tutorial, Nail Polish Swatch, Nails, Nails How To, Style

Swatch of Essie’s Love Every Minute

This ultra feminine manicure is a swatch of Love Every Minute by Essie.  The polish applies a bit streaky, but I reached a desired opacity after three coats. I recommend a good top coat to smooth out the finish. essie-love-every-minute What do you think of this look? Let me know in the comments below. 

Standard
DIY, Essie, Fashion, Nail Art, Nail Polish Swatch, Nails, Nails How To

Swatch of Essie’s Fashion Playground

Say hello to this plucky pistachio shimmer beauty that is Essie’s Fashion Playground!

To get a desired opacity, I applied three coats. In natural light, this pretty color shines with a subtle glimmer infused in the lacquer.

essie-fashion-playground

What do you think of this polish? Let me know in the comments below!

Standard
Beauty, DIY, Fashion, Nail Art, Nail Art Tutorial, Nail Polish Swatch, Nails, Nails How To, Style

Color Changing Nail Polish

A little thermal energy can transform your entire manicure. In a blink of an eye watch these nails change. Yeah, science!

This is Papaya to Mango, a thermal nail polish I got from Simply Spoiled Beauty. The nail polish changes color by playing with differnt temperatures.

The polish has a smooth, matte-like finish and has a quick dry time. I’m wearing two thin layers of it with no top coat. The unintentional ombre effect you get while the polish is on idle is definitely a bonus.

color-changing-nail-polish-yellow-to-orange

Here’s a look at the Purple to Pink transition.

You don’t always need water to see the magic happen, the polish also changes with body temperature. I’m wearing two coats of Purple to Pink and paired with a high shine top coat.

thermal-nail-polish-pink-to-purple

What do you think about color changing polish? Let me know in the comments below. 

Standard
Beauty, DIY, Essie, Fashion, Nail Art, Nail Art Tutorial, Nail Polish Swatch, Nails, Nails How To, Orly

Pokemon Nail Art

With the recent release of Pokemon on Netflix, many 90s kids are reliving their childhood as they follow Ash Ketchum on his adventure to be the greatest Pokemon master. I proudly admit I can bust out the entire Pokerap, no problem.

To continue my walk down memory lane, I created two manicures inspired by one of my favorite cartoons.

1. Ash wants to “Catch them all,” but I will stick these cuties. Bonus points to those of you that remembers the Squirtle Squad.

pokemon-nails

2. Grass, fire, water and electric, the core energy type of Pokemon will forever be the best.

pokemon-nails

Here’s a Vine video showing a time lapse of the making of the Pokemon energy  symbols manicure. 

Are you a fan of Pokemon? Share in the comments below!

Standard
Beauty, China Glaze, DIY, Marc Jacobs, Nail Art, Nail Art Tutorial, Nail Polish Swatch, Nails, Nails How To, Style

Bob Marley Inspired Nails

Bob Marley is worshipped by millions and after watching the documentary, Marley, I finally understand why. While finding out his story and discovering the beliefs of the Rastafarian movement, it was clear that Marley is a legacy of peace.  In honor of the late reggae singer, I created this manicure to show One Love.

rasta-nails-one-love

What do you think of this look? Let me know in the comments below!

Standard
Beauty, DIY, Essie, Nail Art, Nail Art Tutorial, Nail Polish Swatch, Nails, Nails How To, Style

Plunging V Chevron Nail Art Tutorial

Happy Mani Monday! I’m kicking off the week with a pop of color and a simple design.

If you want to do the same, you’ll need to first pick two awesome nail polishes. I used Essie’s The Girls Are Out ($8.50) and NYC  Nail Polish Skyline Blue ($1). You’ll also need some striping tape, scissors and don’t forget your favorite base and top coat.

Here’s how to create an easy-to-do deep V chevron manicure:

1. Use the scissors to cut out at least 20 small pieces of striping tape.

2. Prep your nails with a base coat and let it dry.  Apply two coats of one polish (I used pink) on the accent nail and paint  the rest of the nails another color (I used blue).

3. Once the base color is completely dried and  hardened, apply two pieces of tape to create an inverted pyramid shape starting from the cuticle.

nail-art-tutorial-chevron-nails

4. Paint inside the triangle using the opposite color of the base polish. Quickly and carefully remove the tape while the polish is still wet. When the design is dry, seal it on with a layer of top coat.

deep-v-chevron-manicure

What do you think of this look? Let me know in the comments below!

Standard