Beauty, DIY, Essie, Fashion, Nail Art, Nail Art Tutorial, Nail Polish Swatch, Nails, Nails How To, Negative Space, Style

Negative Space Nail Art Tutorial Using Scotch Tape

If you’re in the mood to unwind with some nail art, I’ve got the mani for you! Read below and find out how you can execute a deep red wine negative space design.

Supplies: Base coat, deep red wine polish, hex glitter polish, top coat, scissors, Scotch tape, dotting pen (or toothpick) and tweezers.

You’re just six steps away from an intoxicating look.

1. Cut out ten small triangles using tape and scissors. The pieces should be small enough to create a negative space around it.

negative-space-tape-mani-1

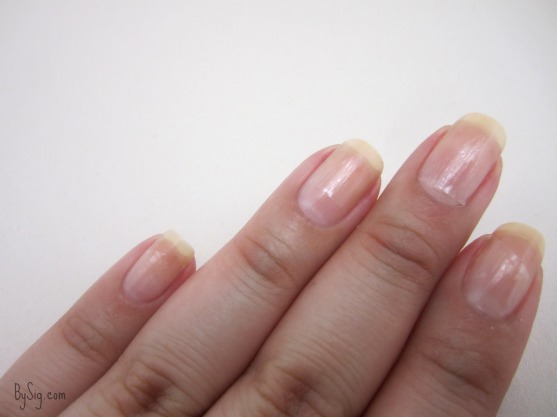
2. Prep the nail with your favorite base coat. I used Essie’s protein base polish ($8.50). Once the polish is completely dry and hardened, use the tweezers to place the triangles on your nails. Have fun with the placement!

negative-space-tape-mani-2

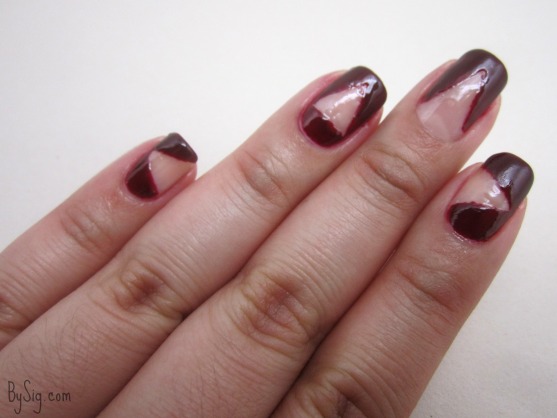
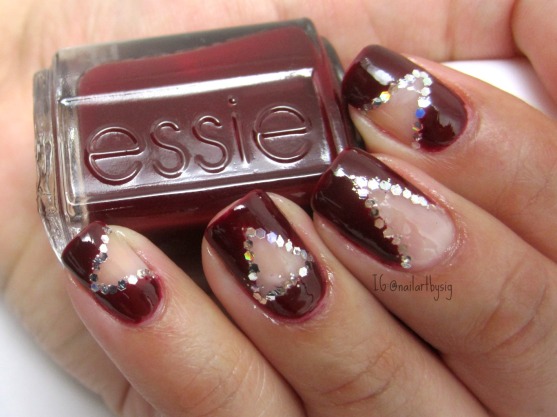
3. Apply the deep red polish (I used Essie’s Bordeaux, $8.50) around the triangle to fill in the negative space. Quickly peal off the tape and be careful not to smudge the polish.

negative-space-tape-mani-3

4. Place a blot of glitter polish on paper and use the dotting pen to pick up and apply sequins. I used Pure Ice’s Dazzle Me ($9.95).

negative-space-tape-mani-4

5. Place the sequins on the nail to outline the triangle.

negative-space-tape-mani-5

6.Once the entire design is completely dry, finish off with a top coat. I used Ocean Nail Supply’s My Quick Dry Nail Lacquer.

negative-space-tape-mani

What do you think of this design? Let me know in the comments below!

Standard
Beauty, Butter London, DIY, Fashion, Nail Art, Nail Art Tutorial, Nail Polish Swatch, Nailed Kit, Nails, Nails How To, Style

Inside Nailed Kit’s January Box

Happy New Year! I am kicking off 2014 with adorable nail art you can execute with no messy clean up.

Over the holidays I received a generous gift from Nailed Kit, a user friendly water slide nail decal system that offer’s a monthly subscription. The gift was a sample of their January Box.

january-box-nailed-kit

The January kit included soft blue nail strips, penguins, snowflakes and blue striped nail art decals, teal rhinestones, a shaping stick and a nail file.

nailed-kit-january-kit

This was my first time using nail strip decals and I couldn’t believe how easy it was. As a nail strip decal novice, I didn’t perfectly place the decal correctly the first time around. But it was no sweat because I was able to easily remove the decal and try again.

I used my thumb and index finger to place the decal and followed with the shaping stick to smooth out any bubbles. If the the strip was a little big, I cut around it with facial hair scissors for precision and filed down the decal to fit my shape.

nailed-kit-1

The entire process is relatively simple: Apply the nail strips (as pictured above), cut out desired decals, soak them in water for about 20 seconds, place the decal and rhinestones on the nail and seal the design with a top coat.

nailed-kit-january-box-final

As a bonus, I even got these special edition New Years decals inside the box.

Nailed-kit-new-years-decals

I paired the New years decals with a metallic silver polish and even added Nailed Kit’s party hat decal I received at the New Girl Expo. I’m wearing Butter London’s Diamond Geezer ($15).

new-years-eve-nailed-kit

Other than the obviously cute designs you’re left with, the best part about Nailed Kit is that there is no messy clean up. Isn’t that reason enough to want to try it?

What do you think of Nailed Kit’s January Box? Let me know in the comments below. 

Standard
Beauty, DIY, Fashion, Marc Jacobs, Nail Art, Nail Art Tutorial, Nail Polish Swatch, Nails, Nails How To, Style

Marc Jacobs Evelyn Nail Polish Swatch

Marc Jacobs 144 Evelyn ($18) is the collection’s opaque smoky gray and it is a beautiful combination of black and white.

Every nail polish collection needs a perfect gray hue for a good tone. Evelyn is just that polish for me.

marc-jacobs-evelyn-swatch

Instagram, @nailartbysig

After the initial coat there were barely any streaks. The creamy formula makes for easy application.

marc-jacobs-evelyn-swatch

Instagram, @nailartbysig

The nail polish has a pretty quick dry time. By the second coat, I reached a desired opacity.

evelyn-marc-jacobs-swatch

Instgram, @nailartbysig

To smooth off the entire look, I added a very thin layer of top coat. The glossy finish is undeniable.

marc-jacobs-nail-polish-evelyn

Instagram, @nailartbysig

This is the sixth installment of a ten-part series of Marc Jacobs nail lacquer swatches. Keep scrolling down for the rest and stay tuned for more.

What do you think of Evelyn?Let me know in the comments below!

Standard
Beauty, Butter London, DIY, Essie, Fashion, Nail Art, Nail Art Tutorial, Nail Polish Swatch, Nails, Nails How To, Style, Vine

Spotted Christmas Nail Art

While decorating my home for the holidays, I came across this nifty ornament.

christmas-nail-art

I was intrigued by the unconventional pattern on it and I created a manicure inspired by it.

easy-to-do-christmas-nails

Instagram, @nailartbysig

Check out this time lapse Vine video I did while executing a design I called, “How Dalmatians Celebrate Christmas.”

What do you think of this design? Let me know in the comments below!

Standard
Beauty, DIY, Fashion, Marc Jacobs, Nail Art, Nail Art Tutorial, Nail Polish Swatch, Nails, Nails How To, Style

Blue Velvet by Marc Jacobs Nail Polish Swatch

Marc Jacobs 132 Blue Velvet ($18) is the collection’s iridescent deep ocean blue.

While wearing this color, I received compliments on the shine of this alluring and rich blue polish. Blue Velvet is particularly stunning in direct sunlight.

marc-jacobs-blue-velvet-nail-polish

Instagram, @nailartbysig

Blue Velvet is very opaque and definitely delivers the high-shine formula it promises. This is what one coat of the polish looks like.

blue-velvet-marc-jacobs-nail-polish

Instagram, @nailartbysig

When I did some clean up around my nails after an application of a thin second coat, I noticed some staining on my skin and cuticles. I’m worried it might be an issue once I completely remove the manicure. Heed my warning, base coat is not optional!

blue-velvet-marc-jacobs-swatch

Instagram, @nailartbysig

To smooth off the entire look, I applied a very thin layer of top coat. Are you in love with this color yet?

blue-velvet-marc-jacobs

Instagram, @nailartbysig

This is the fifth installment of a ten-part series of Marc Jacobs nail lacquer swatches. Keep scrolling down for the rest and stay tuned for more.

What do you think of Blue Velvet? Let me know in the comments below!

Standard
Beauty, Butter London, DIY, Essie, Fashion, Nail Art, Nail Art Tutorial, Nail Polish Swatch, Nails, Nails How To, OPI, Orly, Sally Hansen, Style

4 Winter Worthy Nail Polish Colors

Get in the spirit of the holidays and coat on some polish you can show off all season long.

Here are four winter worthy nail polish colors:

1. Gray nails for a midnight glow for your next holiday party.

I’m using Mirror Mirror by Orly with a coat of Snow Globe by Sally Hansen on the accent nail.

Image

Instagram, @nailartbysig

2. A deep purple hue with a sparkly gold accent for a bit of elegance and mystery on New Years Eve.

Here’s a swatch of  Under Your Spell by Wet n Wild with Wonderous Start by OPI on the party finger.

winter-nail-polish

Instagram, @nailartbysig

3. A shimmery version of the classic crimson when you’re feeling bold.

This is a swatch of Chancer by Butter London.

color-nail-polish-winter

Instagram, @nailartbysig

4. Winter navy blue with a bit of shimmering snow for a cold night out.

I’m wearing Midnight Cami by Essie with a coat of All Sparkly and Gold by OPI on the accent nail.

winter-nail-polish-color

Instagram, @nailartbysig

What do you think of these manicures? Let me know in the comments below!

Standard
Beauty, DIY, Fashion, Nail Art, Nail Art Tutorial, Nails, Nails How To, Style

Negative Space Chevron Nails Tutorial

You’re four steps away from showy and posh nail art.

negative-space-nails-tutorial

Instagram, @nailartbysig.

Execute this design in a breeze by mapping out the placement of the striping before application.

negative-space-chevron-how-to

Instagram, @nailartbysig.

What do you think of this look? Let me know in the comments below!

Standard
Beauty, DIY, Fashion, Katy Perry, Nail Art, Nail Art Tutorial, Nails, Nails How To, Style

Prismatic Nail Art

Lately, I’ve been relating to Katy Perry’s latest album, Prism. Her power anthems radiate positivity and I am letting the light in.

I celebrated my 24th birthday in November. I definitely wanted to shine. So I figured the occassion called for a prismatic mani.

katy-perry-nails

Instagram, @nailartbysig

I was particularly proud of the execution on both hands. They looked equally solid.

katy-perry-nails

Instagram, @nailartbysig

This manicure definitely got some attention. That day, I out-shined my own candles.

Here is a video of the entire manicure.

What do you think of this look? Let me know in the comments below! 

Standard
Beauty, DIY, Fashion, Marc Jacobs, Nail Art, Nail Art Tutorial, Nail Polish Swatch, Nails, Nails How To, Style

Nirvana by Marc Jacobs Nail Polish Swatch

Marc Jacobs 128 Nirvana ($18) is described as a deep army green. While swatching this polish I found the green hue is more prevalent in the bottle than on the nails. But if you’re into a grunge-goth green with an underlying ebony shade, this is your match.

marc-jacobs-nirvana-review

Here is one coat of the polish. The formula is very creamy which leaves a bit of a streak. Steady application is a must!

nirvana-marc-jacobs-swatch

Instagram, @nailartbysig

The polish has a pretty fast dry time. I recommend waiting for the lacquer to completely dry and harden before applying a second coat. You can already see the high gloss finish the polish guarantees. This is two coats of Nirvana.

marc-jacobs-swatch-nirvana

Instagram, @nailartbysig

Nirvana was a hard color to capture on camera. The green shade shows up in natural light, while the dark undertones of the polish are present in almost all inside light. The polish leaves the nails looking totally plasticized with a high shine. While a top coat isn’t necessary, I used a thin layer to smooth out the entire look.

nirvana-by-marc-jacobs-nail-polish

Instagram, @nailartbysig

What do you think of Nirvana? Let me know in the comments below! 

Standard
Beauty, DIY, Fashion, Marc Jacobs, Nail Art, Nail Art Tutorial, Nails, Nails How To, Uncategorized

Marc Jacobs Lux Nail Polish Swatch

Marc Jacobs 124 Lux ($18) is described as an opaque chartreuse yellow and it is truly as beautiful as the sun. The green undertone in the pigment makes the polish a subtle hue you can wear alone without being flamboyant, a unique quality for a yellow lacquer.

marc-jacobs-yellow-nail-polish-review

Instagram, @nailartbysig

The polish has a thick formula that calls for steady application in order to get a streak-free result. Here is what one coat of Lux looks like:

nail-polish-swatch-marc-jacobs

Instagram, @nailartbysig

I definitely recommend for the first coat to completely dry and harden before applying a second one. The polish leaves a very leveled texture which can be hard to smooth out if the previous coat is still wet.

marc-jacobs-nail-polish-yellow

Instagram, @nailartbysig

The polish leaves a shiny finish which doesn’t need a top coat. However, to smooth out the polish, I added a very thin top coat to finish off the entire look.

marc-jacobs-lux-swatch

Instagram, @nailartbysig

Here is a bonus video of the swatch:

What do you think of Lux? Tell me in the comments below! 

Standard