Art Deco, Beauty, DIY, Essie, Fashion, Marc Jacobs, Nail Art, Nail Art Tutorial, Nail Polish Swatch, Nails, Nails How To, Negative Space, Vine

Nails of the Day: Gradient Negative Space Nail Art

Happy Grammy’s day! Contemporary chic meets absolute cuteness in today’s featured nail art.

I used Sugar Coat by Wet n Wild ($1.49) as a base color, added Oui! by Marc Jacobs ($18) as a gradient and layered a coat of Sparked by Wet n Wild ($4.70). To outline the accent nail I used Blanc by Essie ($8.50). I applied a nail accessory from Ocean Nails Supply in the center negative space and placed sequins from Jewelry Heist by Spoiled ($1.99) around the nail art ring.

gradient-negative-space-nail-art

Here’s a time lapse video of the making of this manicure.

What do you think of this look? Let me know in the comment below!

Standard
Uncategorized

Nails of the Day: The Girls Night Out by Essie

I’ve got an incredible family that dreams big with me. It’s no wonder they’re extremely supportive of my nail art ventures. When I visited my parents recently, my mom hooked me up with an amazing nail haul.

Screen shot 2014-01-23 at 12.21.37 AM

Among the bottled  beauties was Essie’s The Girls Are Out. I swooned over the sparkle infused fuchsia polish!

essie-the-girls-are-out

Update: Looks like I got a fan in Essie.

What do you think of The Girls Are Out? Let me know in the comments below. 

Standard
Art Deco, Beauty, DIY, Essie, Fashion, Marc Jacobs, Nail Art, Nail Art Tutorial, Nail Polish Swatch, Nailed Kit, Nails, Nails How To

Jamberry Nails Review

After recently playing with Nailed Kit’s water slide nail art decals and Essie’s nail appliques, my love for vinyl nail stickers has definitely grown. So when Jill, a Jamberry Nails Independent Consultant, sent me over a sample of their nail wraps I got psyched and they didn’t disappoint.

Initially I was impressed with Jamberry Nails intricate and varied designs. I received six decals and chose to try them on as an accent.

jamberry-nails-decals

The application process called for a unique step after a routine nail cleaning and cuticle push. The nail wrap requires heat to soften the adhesive before you stick it on. I pointed my blow dryer on the wrap and used it on a low heat setting for about 5 seconds. It worked.

how-to-use-jamberry-nails

I placed the wrap on my ring finger while it was still warm. I found it best to make sure the placement fit before pressing on the wrap to seal it on because the glue got pretty sticky. I used a rubber cuticle pusher to flatten out any bubbles that formed.

jamberry-nails-review

I folded the leftover sticker and filed it off in a downward motion to get the right fit. While the included directions do not mention to seal the sticker with a top coat, I recommend applying a layer of it if you intend on wearing the wraps for a few days.

jamberry-nails-review-1This is a sample of Reminisce ($15). I paired it with Marc Jacobs’ 128 Nirvana ($18).

jamberry-floral-nails-marc-jacobs-nail-polish

This is Poised Plaid ($15). I paired it with Essie’s Blanc ($8.50).

jamberry-nails-poised-plaid

This is Wisteria ($15). I paired it with Marc Jacobs’ 122 Ultraviolet ($18).

jamberry-nails-wisteria

What do you think of Jamberry Nails? Let me know in the comments below!

Standard
Beauty, DIY, Essie, Fashion, Nail Art, Nail Art Tutorial, Nail Polish Swatch, Nails, Nails How To, Negative Space, Style

Negative Space Nail Art Tutorial Using Scotch Tape

If you’re in the mood to unwind with some nail art, I’ve got the mani for you! Read below and find out how you can execute a deep red wine negative space design.

Supplies: Base coat, deep red wine polish, hex glitter polish, top coat, scissors, Scotch tape, dotting pen (or toothpick) and tweezers.

You’re just six steps away from an intoxicating look.

1. Cut out ten small triangles using tape and scissors. The pieces should be small enough to create a negative space around it.

negative-space-tape-mani-1

2. Prep the nail with your favorite base coat. I used Essie’s protein base polish ($8.50). Once the polish is completely dry and hardened, use the tweezers to place the triangles on your nails. Have fun with the placement!

negative-space-tape-mani-2

3. Apply the deep red polish (I used Essie’s Bordeaux, $8.50) around the triangle to fill in the negative space. Quickly peal off the tape and be careful not to smudge the polish.

negative-space-tape-mani-3

4. Place a blot of glitter polish on paper and use the dotting pen to pick up and apply sequins. I used Pure Ice’s Dazzle Me ($9.95).

negative-space-tape-mani-4

5. Place the sequins on the nail to outline the triangle.

negative-space-tape-mani-5

6.Once the entire design is completely dry, finish off with a top coat. I used Ocean Nail Supply’s My Quick Dry Nail Lacquer.

negative-space-tape-mani

What do you think of this design? Let me know in the comments below!

Standard
Beauty, DIY, Essie, Fashion, Nail Art, Nail Art Tutorial, Nail Polish Swatch, Nails, Nails How To

Essie’s Steel the Way Nail Appliques Review

Essie’s “Steel the Way” sleek stick nail appliques ($10.25) come in a textured chrome honeycomb design meant to mimic a glam nail art look without picking up a brush. While the packaging says the manicure will last up to 10 days, mine came off while I was eating pizza.

essie-nail-sticker-steel-the-way

The packet comes with a sheet of 18 stickers (ranging in size), a nail file, a plastic application tool and easy-to-follow instructions.

essie-nail-sleek-stick

No base coat or top coat was recommended, so upon execution simply use your index finger and thumb to apply the suitable fitting nail sticker and even out any bubbles with the application tool.

steel-the-way-how-to-essie

Once perfectly placed, fold over the leftover sticker and file it off in a downward motion to get the right fit.

essie-how-to-nail-sticker

After completing the manicure I was extremely pleased with the beautiful design. The instructions did not recommend a top coat, so I left it as it.

essie-steel-the-way

About six hours after applying the nail appliques, I found myself grubbing on some pizza and noticed the extra sauce caused the sticker to lift up. By the time I was done eating, I lost a nail. That was no fun. My one recommendation: don’t skip the top coat if you want these beauties to last.

steel-the-way-essie

What do you think of nail stickers? Let me know in the comments below. 

Standard
Beauty, Butter London, DIY, Fashion, Nail Art, Nail Art Tutorial, Nail Polish Swatch, Nailed Kit, Nails, Nails How To, Style

Inside Nailed Kit’s January Box

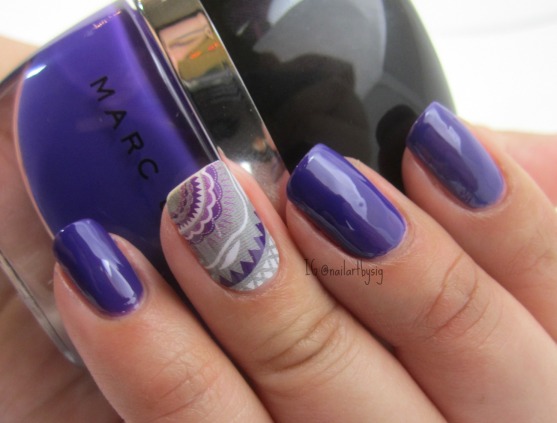
Happy New Year! I am kicking off 2014 with adorable nail art you can execute with no messy clean up.

Over the holidays I received a generous gift from Nailed Kit, a user friendly water slide nail decal system that offer’s a monthly subscription. The gift was a sample of their January Box.

january-box-nailed-kit

The January kit included soft blue nail strips, penguins, snowflakes and blue striped nail art decals, teal rhinestones, a shaping stick and a nail file.

nailed-kit-january-kit

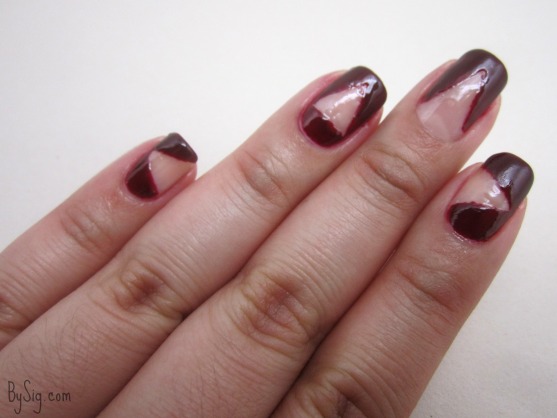
This was my first time using nail strip decals and I couldn’t believe how easy it was. As a nail strip decal novice, I didn’t perfectly place the decal correctly the first time around. But it was no sweat because I was able to easily remove the decal and try again.

I used my thumb and index finger to place the decal and followed with the shaping stick to smooth out any bubbles. If the the strip was a little big, I cut around it with facial hair scissors for precision and filed down the decal to fit my shape.

nailed-kit-1

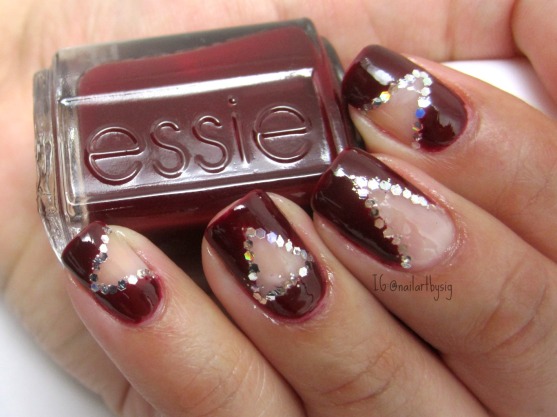
The entire process is relatively simple: Apply the nail strips (as pictured above), cut out desired decals, soak them in water for about 20 seconds, place the decal and rhinestones on the nail and seal the design with a top coat.

nailed-kit-january-box-final

As a bonus, I even got these special edition New Years decals inside the box.

Nailed-kit-new-years-decals

I paired the New years decals with a metallic silver polish and even added Nailed Kit’s party hat decal I received at the New Girl Expo. I’m wearing Butter London’s Diamond Geezer ($15).

new-years-eve-nailed-kit

Other than the obviously cute designs you’re left with, the best part about Nailed Kit is that there is no messy clean up. Isn’t that reason enough to want to try it?

What do you think of Nailed Kit’s January Box? Let me know in the comments below. 

Standard
Beauty, China Glaze, DIY, Essie, Fashion, Mabelline, Nail Art, Nail Art Tutorial, Nail Polish Swatch, Nails, Nails How To, Negative Space, OPI, Orly, Style

4 New Year’s Eve Manicure Ideas

This year I found creative expression. I will remember 2013 as the year I discovered nail art.

Though I’m little late in the game, I don’t care. I am up to something I am passionate about and I am not going to stop learning and growing any time soon. In fact, by this time next year I will be a licensed nail tech (stay tuned to find more about that in a future post).

To celebrate the discovery I am sharing with you four of my favorite nail art trends of the year. Here are four gorgeous manicures you can rock on New Year’s Eve to summon fabulous vibes for 2014:

1. Glamorous oxblood  nails paired with a gold and black glitter accent to ring in the new year in style. I’m wearing OPI Visions of Love and Wonderous Star from the Mariah Carey mini holiday set.

opi-mariah-carey-holiday

2. A twist on the tip of a black prism manicure to show you’re ready to take on new challenges and let the light in 2014. I’m wearing Liquid Leather and Prism by China Glaze.

black-prism-china-glaze

3. Show off a sequin-filled negative space mani thats reminds others to keep their eye on you in the coming months. I’m wearing Maybelline Express Finish Denim Dash with gold glitter pieces.

blue-gold-negative-space-nails

4. Up the ante at the stroke of midnight with a tape design your future self will thank you for. I’m wearing Blanc by Essie, Mirror Mirror by Orly and All Sparkly and Gold by OPI form the Mariah Carey holiday set.

tape-mani-gold-white-orly

How will you remember 2013? Let me know in the comments below. 

Standard
Beauty, DIY, Essie, Fashion, Nail Art, Nail Art Tutorial, Nail Polish Swatch, Nails, Nails How To, Negative Space, Sally Hansen, Style

6 Christmas Nail Art Ideas

Happy Holidays! Tis the season to show off your nail art skills with a manicure even Mrs. Claus would wear.

Here are 6 Christmas manicure ideas:

1. A simple chevron french for the busy Christmas shopper.

christmas-chevron

2. Edgy glitter nails for the mani maven on the naughty list.

edgy-glitter-christmas

3.  A little something to unwrap.

christmas-present-mani-final

4. Kisses under the mistletoe to share your love for the season.

mistletoe-mani-christmas

5. Snowflake nails for a white Christmas.

snowflake-nails

6. A holly jolly manicure to show your holiday spirit.

christmas-day-nails-final

What do you think of these manicures? Let me know in the comments below. 

Standard
Beauty, DIY, Fashion, Marc Jacobs, Nail Art, Nail Art Tutorial, Nail Polish Swatch, Nails, Nails How To, Style

Marc Jacobs 114 Snap! Nail Polish Swatch

Marc Jacobs 114 Snap! ($18) is the collection’s mandarin orange.

The beautiful orange hue provided a much needed pop of color during this cold season. While wearing Snap! I noticed my skin glowed! I’m looking forward to sport this polish in the summer.

marc-jacobs-nail-polish-snap-swatc

The creamy formula allowed for easy application with an opaque finish after the initial coat.

marc-jacobs-orange-snap-nail-polish

Snap! has a pretty fast dry time and leaves a high-gloss finish. The orange hue is very easy on the eyes even after a second coat.

snap-marc-jacobs-nail-polish-swatch

I was so impressed by the extra smooth finish I got after two coats, I didn’t even apply a top coat. I mean just look at these bright beauties!

marc-jacobs-snap-nail-polish-swatch

This is the seventh installment of a ten-part series of Marc Jacobs nail lacquer swatches. Keep scrolling down for the rest and stay tuned for more.

What do you think of Snap?Let me know in the comments below!

Standard
Beauty, DIY, Fashion, Marc Jacobs, Nail Art, Nail Art Tutorial, Nail Polish Swatch, Nails, Nails How To, Style

Marc Jacobs Evelyn Nail Polish Swatch

Marc Jacobs 144 Evelyn ($18) is the collection’s opaque smoky gray and it is a beautiful combination of black and white.

Every nail polish collection needs a perfect gray hue for a good tone. Evelyn is just that polish for me.

marc-jacobs-evelyn-swatch

Instagram, @nailartbysig

After the initial coat there were barely any streaks. The creamy formula makes for easy application.

marc-jacobs-evelyn-swatch

Instagram, @nailartbysig

The nail polish has a pretty quick dry time. By the second coat, I reached a desired opacity.

evelyn-marc-jacobs-swatch

Instgram, @nailartbysig

To smooth off the entire look, I added a very thin layer of top coat. The glossy finish is undeniable.

marc-jacobs-nail-polish-evelyn

Instagram, @nailartbysig

This is the sixth installment of a ten-part series of Marc Jacobs nail lacquer swatches. Keep scrolling down for the rest and stay tuned for more.

What do you think of Evelyn?Let me know in the comments below!

Standard