Art Deco, Beauty, DIY, Minnie Mouse Nails, Nail Art, Nail Art Tutorial, Nails, Nails How To, Uncategorized

Art Deco Nails Tutorial

Be retro and bold in a manicure filled with geometric shapes and strong colors.

Polka-Dots-Nails-Stripes-Nails-Nail-Art

Be bold in an art deco manicure that’s easy to execute with two techniques.

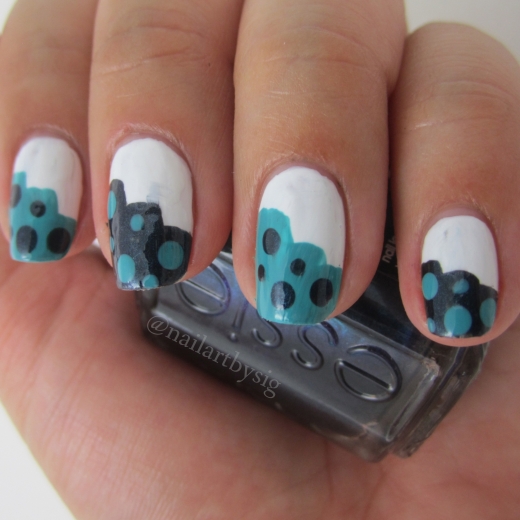
To execute this art deco manicure, you’ll need to mix two techniques: brushing and dotting. You’ll also need three different colored polishes of your choice.

Let’s get to work.

1. Prep the nails with a base coast. Once dry, apply two coats of a polish of your choice. I chose white polish as the background color in the manicure pictured above.

2. Using a thin brush or the side tip of your polish brush, apply one vertical line on the left side of the nail bed above the vertical half-way mark. You can mix and match the polishes as I did the manicure shown above.

3. Draw on two more vertical stripes one shorter than the previous one so that it looks like your phone’s reception bars.

4. Apply dots of the opposite polish color using a dotting tool.

5. Let the design completely dry and finish off with a top coat.

Check out this six-second tutorial and find out why mixing techniques creates a great manicure.

Let me know if you try out this design. Good luck!

Standard
DIY, EDM, Nail Art, Nails, Steve Aoki, Vine

Steve Aoki Nail Art

If you follow Steve Aoki on Vine, then on Monday, you too were bombarded with bite-size loops of his single, “Boneless.” The beat is still stuck in my head.

The EDM giant took to the six-second video sharing platform to connect with his fans.

He revined dozens of posts with the hashtag #steveaoki. I decided to try my luck and join in on the fun.

My approach was to get his attention with a Steve Aoki inspired manicure.

The manicure is a sunset gradient with a white accent nail. On the index and ring finger, I painted a palm tree. The idea came from his album cover. I painted the superstar DJ’s signature logo on the accent nail with the white polish.

Here’s hoping the face of Dim Mak sees and maybe even revines my Aokified nail art!

Steve-Aoki-Nails-Aokied-Nail-Art

Hundreds of people on Vine tried to get Steve Aoki’s attention. This was my approach.

Standard
Baseball, DIY, Dodgers, Nail Art, Nail Art Tutorial, Nails, Nails How To, Sports

Dodgers Nails Tutorial

After six years, I found myself back at the Dodgers Stadium in the heart of Los Angeles. Naturally, I sported my love for the team on my nails.

Baseball-Nails-Dodgers-Nails

Be the die hard fan at the next game with an easy-to-do baseball manicure.

As a native Angelina, my first baseball nail manicure had to show off Los Doyers. Here’s how to be the most loyal fan at the next game.

1. Prep the nail with a base coat. Apply two coats of white polish on the ring finger (the baseball nail). Polish two coats of Dodger blue polish on the rest of the nails.

2. Once dry, use a thin brush to apply two red lines in a C shape on the white nail. Add shorter lines on the C-shaped lines to create the stitching on the baseball.

3. Wash and dry the thin brush. Use white polish to apply “LA” on the middle finger. Try to wait until each line is dry to prevent streaking.

4. Let the design completely dry and finish off with a top coat.

Check out this six-second tutorial and find out how easy it is to flaunt your fandom.

Batter up!

Dodger-Nails-Baseball-Nails-Nail-Art

Though I don’t have proof, I do have witnesses to testify these babies made it to the jumbo tron!

Standard
DIY, Galaxy Nails, Nail Art, Nail Art Tutorial, Nails, Nails How To

Galaxy Nails Tutorial

Do you want to rock a manicure that is out of this world? Get ready for take off!

Galaxy-Nails-Nail-Art-Glitter-Nails

Blend your favorite polishes for a beautiful atmosphere at the tip of your finger.

Here’s how to bring out your inner space cadet with a galaxy nails manicure that will take to the moon in just three steps.

1. Prep the nail with a base coat. Apply two coats of black polish to the entire nail.

2. Once dry, take a makeup sponge and dab one blot of a pink polish. Repeat step with your choice of polishes for your ideal Milky Way mani.

3. Use a dotting tool and white polish to apply a couple of stars (dots) on the nail.

3. Layer on a thin coat of glitter polish. Let the design completely dry and finish off with a top coat.

Check out this six-second video tutorial and find out what colors I blended to create my galaxy nails manicure.

Blast off!

Standard
Disney, Disney Nails, DIY, Mickey Mouse Nails, Minnie Mouse, Minnie Mouse Nails, Nail Art, Nail Art Tutorial, Nails, Nails How To

Minnie Mouse Inspired Nail Art Tutorial

If you’re a Disney fan like me, a Minnie Mouse inspired manicure is a must.

Minnie-Mouse-Nails-Tutorial-Disney-Nail-Art-Latina-Nail-Art-Blogger

Three polishes, one dotting tool and a whole lot of fun make up this easy-to-do mani.

Here’s a how to execute a Disney inspired mani in under four steps.

1. Prep the nail with a base coat. Apply two coats of white polish on the ring finger (where Mickey will go). Polish the other nails with two coats of pink polish.

2. When the nails are dry, use a dotting tool to apply the polkadots Minnie loves to wear using a white polish on the pink polished nails. Make sure to space out the dots evenly.

3. Use a dotting tool with the biggest sphere and black polish to apply three dots in the shape of Mickey’s head on the tip of the nail bed.

4. Let the design completely dry and finish off with a top coat.

Check out this six-second tutorial:

Best of luck, be creative and don’t forget to have fun!

Standard
Beauty, Nail Art, Nail Art Tutorial, Nails, Nails How To

Under Maintenance

Thank you so much for stopping by!

I can’t wait to share my creative expressions with you. Please bear with me as I gear up to launch this thing!

.  . . You can expect lots of glitter in the near future. Here’s a sneak peak! You can find me on IG: @nailartbysig

Photo Credit: Instagram, @nailartbysig

Find more of my work on Instagram: @nailartbysig

By,
Sigourney

Standard