
While out with a couple of girlfriends at a local wine bar on Thursday night, my inner artist met my inner wino during a Paint Nite event- a beautiful combination of art lessons and alcohol.
A blank canvas, some paint and two glasses of sangria later, I recreated a version of what the art teacher described as, “Colorful Birds on a Wire.”
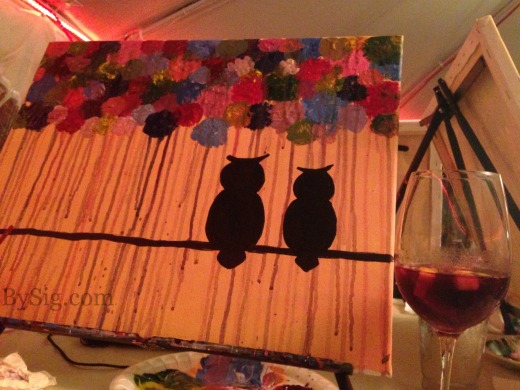
The masterpiece I created at a Paint Nite event inspired a manicure.
Naturally, I got inspired to recreate the painting on my nails.

Recreate this dripping paint manicure in five easy steps.
While at the event, I learned a new technique called dripping paint. I put my new found knowledge to work.
Here’s how to execute a dripping paint manicure.
1. Prep the nails with a base coat. Apply two coats of white polish.
2. When the nails are dry, use a dotting tool to apply blots of blue polish around the nail bed. With a bit of polish on the dotting tool, drag some of the lacquer down to the nail tip for the dripping effect. Repeat this step with a color palette of your choice.
3. When the polishes are dry, use a thin brush to draw a black line across the tip of the nail to draw the wire.
4. To draw an owl, use a dotting tool with a small sphere and black polish to create an oval (the body) and a circle (the head) on top of on the black line. Draw an upside down arch line on the top of the circle to make the owl’s feathers.
5. Let the design completely dry and apply a top coat.
Take a look at this six-second tutorial to see how I layered the different colored polishes and got the dripping paint effect.
What do you think about the dripping paint effect? Let me know if you try this look!

Pingback: Blog topics | kendrickcrisp